Month: April 2020

  • Using a Binding in SwiftUI – Simple Example

    In my original post on Bindings in SwiftUI, I had mentioned when we might want to use a binding:

    You would use a binding to create a two-way connection between a property that stores data, and a view that displays and changes the data.

    I showed an example of how we could bind one of our local @State properties to a Toggle. The Toggle could update the state of our property through it.

    We can use other system controls, such as TextField or Picker, to also update our local variables. But what if we want to have another one of our views update a variable owned by another? Let’s solve a simple example and, in doing so, we’ll see when we will make use of @Binding.

    I have a simple view that displays my name. I am storing it locally as a variable.

    struct NameDisplayView: View {
        var name: String = "unknown"
        
        var body: some View {
            Text("Your name is \(name)")
        }
    }

    It simply takes the text there and outputs "Your name is unknown". It works, but I want to be able to update that name so I can have it show me and not assume I have no name.

    Well, we know how we can bind to something from our original post. So let’s make a view where we can change some text.

    struct NameChangeView: View {
        @State var text: String
        
        var body: some View {
            TextField("Type Here", text: $text)
        }
    }

    So far, this is a simple example. If we loaded up NameChangeView, we could tap into the TextField and, as we type, text would be updated. Why? Because we have it bound to the text property on TextField, which is of type Binding<String>. So as the TextField updates the text, our view can get the latest values.

    But let’s say we want to present this view as a sheet, let the user update the text, and then send it back to our original view. Can we do it? Yes!

    What do we need to change so that our NameChangeView can pass changes back from itself to another view? All we have to do is change @State to @Binding. With that change, we now have two way communication via that variable.

    Let’s add a little styling and a way to dismiss the view. That gives us our final form:

    struct NameChangeView: View {
        @Environment(\.presentationMode) var presentationMode
        @Binding var text: String
        
        var body: some View {
            TextField("Type Here", text: $text, onCommit: { self.presentationMode.wrappedValue.dismiss() })
            .textFieldStyle(RoundedBorderTextFieldStyle())
            .padding()
        }
    }

    Now, how can we use this in our original view?

    We’ll add a button to trigger a sheet. This happens by binding a local Bool to the .sheet(isPresented:) modifier. Lastly, we add our NameChangeView as what is being presented modally as a sheet. We pass our local name variable as a binding to that view, so it becomes $name.

    struct NameDisplayView: View {
        @State var name: String = "unknown"
        @State var showNameChange = false
        
        var body: some View {
            VStack {
                Text("Your name is \(name)")
                Divider()
                Button("Change") {
                    self.showNameChange = true
                }
            }
            .sheet(isPresented: $showNameChange) {
                NameChangeView(text: self.$name)
            }
        }
    }

    Now, we can tap on “Change”, which will present our text field. We can tap on it, change our name, hit “Return”, and be taken back to our original view but with our name in place.

    Bindings might seem like a new concept to iOS developers, but they open up a lot of possibilities in Swift. Explore various ways that you can use bindings to communicate between views. You’ll find them very useful, especially in cases of user input as we saw in our example.

    You can find the example code in this Github Gist.

  • ‘Frolicking around in excess’

    Matt Birchler, writing about what matters in a phone:

    So when I see the $399 iPhone SE with 5 years of likely updates, with a really good single lens camera, and with it’s processor that’s faster than all 2020 $1,000+ Android phones, and will likely still be faster than all 2021 Android phones…well, it just looks like a good phone, and it makes it look like we’ve been frolicking around in excess for years now.

    I’m one of those people with an iPhone 11 Pro. I enjoy Face ID. I like the ways I can interact with my phone without a home button. I like the triple camera system. I don’t regret owning it. But I also know it’s not for everyone.

    For everyone else, people that are just looking for the best deal on a smartphone in general, Matt hits it right on the head: The new iPhone SE is likely the best purchase you can make right now. Maybe even the best purchase next year.

  • Bindings in SwiftUI

    Property wrappers were one of the recent additions to Swift. SwiftUI makes use of several very useful property wrappers. One of them is @Binding. The @Binding property wrapper is really just a convenience for the Binding<T> type.

    But before we go into using bindings, what are bindings?

    Per Apple’s documentation, a binding connects a property to a source of truth stored elsewhere, instead of storing data directly. You would use a binding to create a two-way connection between a property that stores data, and a view that displays and changes the data.

    In SwiftUI, you’ll find this to be a fairly common pattern, especially with built in input fields.

    Binding Example

    Let’s say we want a view with a switch for the user to interact with. How do we build it?

    struct BindingExample: View {
        @State var switchIsOn = false
    
        var body: some View {
            Form {
                Toggle(isOn: $switchIsOn) {
                    Text("Switch 1")
                }
            }
        }
    }

    First, we need a mutable variable to hold the state of our switch. In this case, we have a Bool, named switchIsOn. We have to use the @State wrapper so it can be modified in our view.

    Next, when we build our Toggle, we need to provide a binding to a property that will hold the state of the toggle. When we pass in the variable, we use the dollar sign to denote that we’re binding to it. So our view holds the current state of switchIsOn, while the Toggle has a binding internally. When the state of the Toggle flips, it is propagated through $switchIsOn back into our view.

    Creating a manual binding

    If we again look at Apple’s description of a binding, we see that it involves a two-way connection. The binding needs to know the value to get, and where to set the new value when it is changed.

    With that knowledge, we can look at how Binding workings. Let’s look at our example again. This time, we’re going to make a binding ourselves.

    struct BindingExample: View {
        @State var switchIsOn = false 
    
        var body: some View {
            Form {  
                Toggle(isOn: Binding(get: {
                    self.switchIsOn
                }, set: { newValue in
                    self.switchIsOn = newValue
                }) ) {
                    Text("Also Switch 1")
                }
            }
        }
    }

    Binding has an initializer that takes a couple of arguments. One, with the get label, is a closure explaining where the binding gets its value. In our example, this is our switchIsOn variable. The other, set, is given the new value for the binding. This gives us the opportunity to do something with it now that it has changed. In our case, we’re setting switchIsOn to the new value.

    In its most basic form, Binding opens up a lot of interesting possibilities. In later posts, I’ll talk about when we might want to create a binding between our views, as well as some interesting problems a manual binding can solve.

  • Portrait Mode and the Neural Engine on iPhone SE

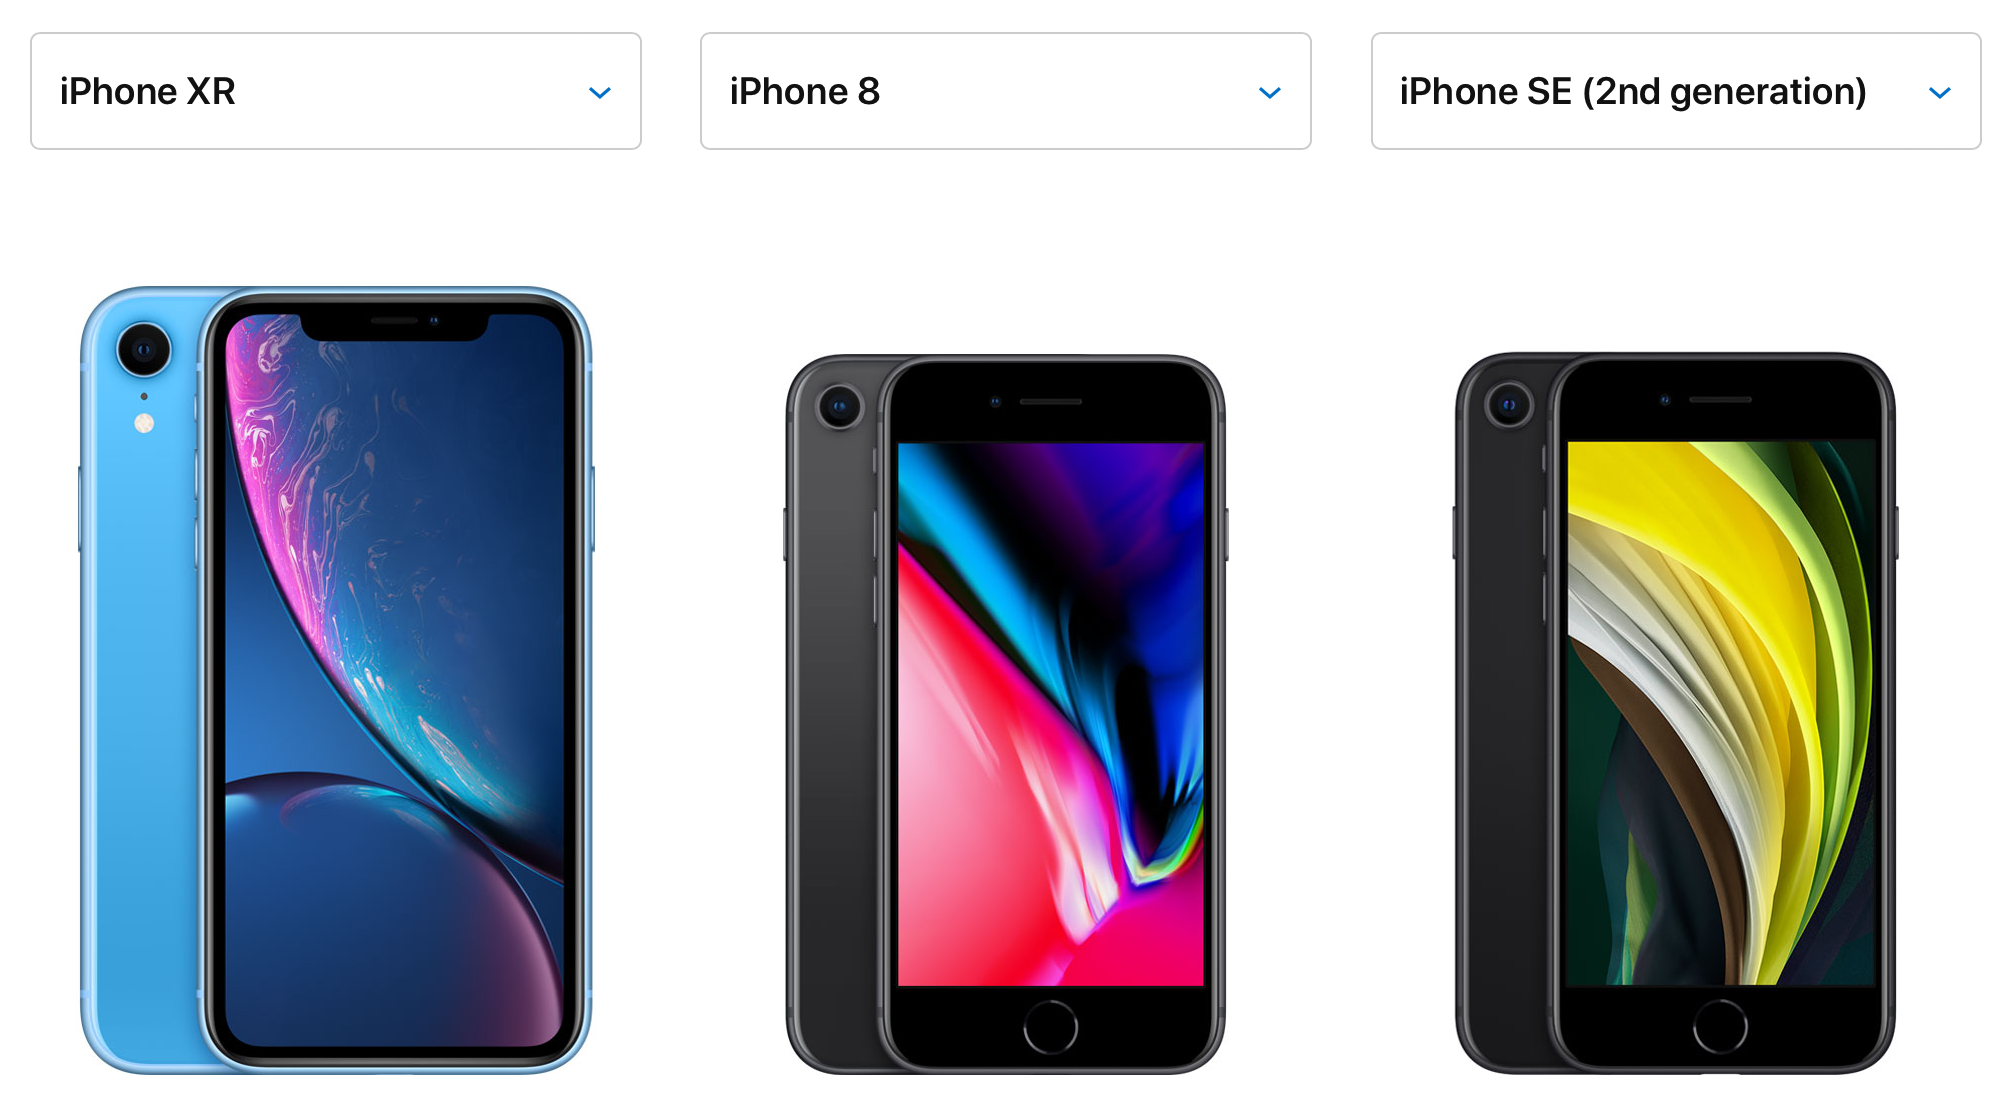
    Apple finally announced the successor to the iPhone SE. Also called the iPhone SE (and from here, the one I am referring to with that name), it built on the expectations that many were thinking: A reuse of an existing design with newer internals. This is exactly how Apple approached the first SE model. So it made since that the new iPhone SE followed suit.

    Design wise, the iPhone SE is identical to the iPhone 8 that it replaced. But internally, it contains a lot of technology found in the iPhone 11: A13 Bionic chip with the third generation Neural Engine, support for WiFi 6, Gigabit class LTE, etc. It also made some changes from the iPhone 8 in line with the iPhone 11, such as the removal of 3D Touch.

    But there are some camera differences with the iPhone SE, especially when compared to the iPhone 8, that made me really think.

    Portrait Mode

    The iPhone SE, like the visually identical iPhone 8, has a single camera on the back side. If you compare the specs between the iPhone 8 and iPhone SE, you’ll see no difference:

    • Single 12MP Wide camera
    • Wide: ƒ/1.8 aperture
    • Optical image stabilization
    • Digital zoom up to 5x
    • True Tone flash with Slow Sync

    The iPhone 8 camera was really good, so keeping that same sensor, especially to reduce cost, makes sense.

    But there’s something the iPhone SE has than its predecessor didn’t have:

    • Portrait mode with advanced bokeh and Depth Control
    • Portrait Lighting with six effects (Natural, Studio, Contour, Stage, Stage Mono, High‑Key Mono)

    The iPhone SE adds Portrait mode, something that initially came to the iPhone 7 Plus because of its dual cameras. Bringing this to a 4.7-inch iPhone like the iPhone SE is a first.

    Now, this isn’t the first time a single camera iPhone has received Portrait Mode. The iPhone XR, released in 2018, had a single backside camera and supported Portrait Mode. If we compare the stats of the XR’s backside camera against the iPhone 8 and iPhone SE, we’ll see that it’s identical. However, there is a notable difference with the iPhone XR:

    • Portrait Lighting with three effects (Natural, Studio, Contour)

    The iPhone XR only supports three effects in Portrait Mode on the single backside camera. What gives?

    Apple explains in their press release:

    iPhone SE features the best single-camera system ever in an iPhone with a 12-megapixel f/1.8 aperture Wide camera, and uses the image signal processor and Neural Engine of A13 Bionic to unlock even more benefits of computational photography, including Portrait mode, all six Portrait Lighting effects and Depth Control.

    The neural engine in the A13 is able to do much better with the single camera sensor input to process all of the available effects for Portrait Mode. So much so that it enables all six effects on the single camera!

    But it doesn’t stop there!

    A First on an iPhone

    Let’s compare the front camera on the iPhone 8, iPhone XR, and iPhone SE.

    The iPhone 8 and iPhone SE both have identical specs:

    • FaceTime HD camera
    • 7MP photos
    • ƒ/2.2 aperture
    • Retina Flash
    • Auto HDR for photos
    • 1080p HD video recording at 30 fps

    Since it doesn’t include the TrueDepth camera system, which uses a camera and additional sensors to detect facial features and depth, the iPhone SE has Touch ID instead of Face ID for unlocking the device. It also makes sense that it doesn’t have Portrait Mode on the front camera.

    Except it does.

    • Portrait mode with advanced bokeh and Depth Control
    • Portrait Lighting with six effects (Natural, Studio, Contour, Stage, Stage Mono, High‑Key Mono)

    Again, from Apple’s press release, just after the earlier quote:

    Using machine learning and monocular depth estimation, iPhone SE also takes stunning Portraits with the front camera.

    The iPhone SE is the first iPhone without the TrueDepth camera system with front facing Portrait Mode. It’s using a single camera, like the backside, to enable the same level of Portrait Mode, using the same cameras as found in the iPhone 8.

    It’s amazing what the A13 Bionic chip is able to enable. It and the third generation Neural Engine definition power the most powerful smartphones in the world. In the words of Apple SVP Phil Schiller: “It’s a big deal.” And to be able to include their fastest chip in their cheapest iPhone? An easy win for Apple.

  • Property Wrappers in Swift

    With Swift 5.1 and Xcode 11, many new features came to Swift. A lot of these were built in to help enable SwiftUI in Apple’s latest OS releases. While diving into SwiftUI is a great way to understand those features, there are some that we don’t need to go into SwiftUI to understand. One of these is property wrappers.

    I like to explain property wrappers by a literal definition of the phrase: They wrap properties in functionality. While there are some built into various Apple frameworks (ie SwiftUI), it’s easy to create your own, and they can give you a lot of neat functionality.

    How to create a property wrapper

    To define a property wrapper, you need to have a custom type (I typically use structs) that you mark as a property wrapper with the @propertyWrapper keyword.

    @propertyWrapper
    struct Wrapper { 
    
    }

    By adding that attribute, my type now must conform to its requirements. To do so, I need to add a non-static property named wrappedValue. The type of this property will depend on the kind of wrapper you are building. Let’s look at some practical examples and see what we can build.

    Easily decoding an ISO 8601 Date

    Since Swift 3, we’ve had the very convenient Encodable and Decodable protocols. The type alias Codable is how we typically see it. Having our models conform to Codable allows us to easily encode and decode our models to and from JSON for API communication.

    The Date type conforms to Codable. But how does it encode/decode by default?

    struct DateTest: Codable {
        var date: Date = Date()
    }
    
    let dateTest = DateTest()
    let data = try JSONEncoder().encode(dateTest)
    let json = try JSONSerialization.jsonObject(with: data, options: [])
    
    print(json)
    // {
    //    date = "608081487.019236";
    // }

    Okay. At least Date can encode automatically. I can live with that. But it looks like it’s turning a date into a number. What if we want to work with different standard, such as an ISO 8601 Date?

    What is an ISO 8601 Date? It a popular date format presented as a string where a date like 10:43 pm on April 4, 2020 would appear like this:
    2020-04-08T22:43:30+00:00

    So can Date decode this by default? Let’s find out!

    let isodateJSON = """
    {
        "date": "2012-07-14T01:00:00+01:00"
    }
    """
    
    let isoDecodeTest = try JSONDecoder().decode(DateTest.self, from: isodateJSON.data(using: .utf8)!)

    So using a multi-line statement in Swift, I’m going to try and decode an instance of our DateTest struct with this JSON object. Will this work? If you saw how Date encoded itself, then you won’t be surprised by the response we get from trying to decode this JSON.

    ERROR: typeMismatch(Swift.Double, 
        Swift.DecodingError.Context(codingPath: [CodingKeys(stringValue: "date", intValue: nil)], 
        debugDescription: "Expected to decode Double but found a string/data instead.", 
        underlyingError: nil))

    While we have a valid date format, Date is expecting a Double. What can we do?

    We could create a custom JSONDecoder when decoding our type. But if we want to support ISO 8601 dates across various models, then we have to create custom decoders for all of them. That could end up being a lot of manual decoding work. OR… we could create a property wrapper to automatically decode the string coming from our JSON into a valid Date.

    We start by creating our property wrapper. Ultimately, we want to provide a Date. So that will be our wrapped type.

    @propertyWrapper
    struct ISO8601Date {
        var wrappedValue: Date
    }

    This satisfies the basic requirements of @propertyWrapper. Now we have to add our own functionality. In our case, here is where we will build our custom encoding and decoding capabilities.

    We start by declaring ISO8601Date itself as conforming to Codable. This will let us wrap properties in a Codable-conforming model and not cause any errors about a model needing to manually provide such conformance.

    Next, we create our custom Codable conformance within our ISO8601Date struct.

    init(from decoder: Decoder) throws {
        let value = try decoder.singleValueContainer()
        let stringValue = try value.decode(String.self)
        if let date = ISO8601DateFormatter().date(from: stringValue) {
            wrappedValue = date
        } else {
            throw DecodingError.typeMismatch(Date.self, DecodingError.Context(codingPath: [], 
                            debugDescription: "Failed to decode ISO Date. Invalid string format."))
        }
    }
    
    func encode(to encoder: Encoder) throws {
        var container = encoder.singleValueContainer()
        
        let string = ISO8601DateFormatter().string(from: wrappedValue)
        try container.encode(string)
    }
    

    Our initializer will try and decode a string. If this string can be used to decode a date in the ISO 8601 standard format, it will do so. Otherwise, it will throw an error. Meanwhile, our custom encode function takes the stored date and encodes it into a string using the ISO8601DateFormatter.

    Lastly, we add a simple init to allow the user to set a default value with our property wrapper.

    init(wrappedValue: Date) {
        self.wrappedValue = wrappedValue
    }

    Put all of this together and what do we get? If we look at our original DateTest model, we can now prepend the @ISO8601Date attribute to our date property and it will encode to and decode from an ISO 8601 string automatically.

    struct DateTest: Codable {
        @ISO8601Date var date: Date = Date()
    }

    Using UserDefaults for property storage

    You may be using UserDefaults in your app to store simple properties. Perhaps it’s a Bool saying if a user has enabled or disabled some feature. Or perhaps you’re storing a String of the last logged in user. You may have built convenience properties to read and write these values. In doing so, you may have ended up with a pattern like this:

    class SettingManager {
        static var userViewedWhatsNew: Bool {
            get {
                UserDefaults.standard.bool(forKey: "userViewedWhatsNew")
            }
            set {
                UserDefaults.standard.set(newValue, forKey: "userViewedWhatsNew")
            }
        }
        
        static var lastLoggedInUser: String? {
            get {
                UserDefaults.standard.string(forKey: "lastLoggedInUser")
            }
            set {
                UserDefaults.standard.set(newValue, forKey: "lastLoggedInUser")
            }
        }
    }

    There’s nothing wrong with the above code (except maybe hard-coded key values). But as you add support for more and more properties, things get to be real tedious. So if we were to abstract this out, what pattern do we see?

    For each property, we are both (a) getting the value from UserDefaults and (b) setting the value to UserDefaults using the same (c) key. With this pattern in mind, let’s approach our property wrapper.

    @propertyWrapper
    struct UserDefault<StoredType> {
        public let key: String
    
        var wrappedValue: StoredType {
            get {
                UserDefaults.standard.object(forKey: key) as! StoredType
            }
            set {
                UserDefaults.standard.set(newValue, forKey: key)
            }
        }
    }

    Instead of using wrappedValue to store a value we initialize, like in our first example, we have a computed getter and setter. It is performing our reading and writing with UserDefaults. The key used for those transactions? We provide it in our property wrapper.

    What data type does this work with? You’ll see that we are using a generic type (StoredType). It will inherit the type from whatever you end up wrapping.

    But wait! What if you wrap an optional type, like String?. Won’t the getter crash if there is no object for key? Nope! Because it’s coming back as an optional, or Optional.none case (if you look at how Optionals work in Swift), which is a valid value for something of type String?. But if we did try to read a String that wasn’t there, then it would crash.

    So how about we add a default value?

    @propertyWrapper
    struct UserDefault<StoredType> {
        public let key: String
        public let defaultValue: StoredType
    
        var wrappedValue: StoredType {
            get {
                UserDefaults.standard.object(forKey: key) as? StoredType ?? defaultValue
            }
            set {
                UserDefaults.standard.set(newValue, forKey: key)
            }
        }
    }

    Now we will attempt to return a value of type StoredType from UserDefaults but, in the event no such object exists, we will return our defaultValue.

    How can we use this in our SettingManager above?

    class SettingManager {
        @UserDefault(key: "userViewedWhatsNew", defaultValue: false) 
        static var userViewedWhatsNew: Bool    
    
        @UserDefault(key: "lastLoggedInUser", defaultValue: nil) 
        static var lastLoggedInUser: String?
    }

    If we were to add support for a new property stored in UserDefaults, it is super simple.

    Now, notice how we are setting the key and defaultValue properties when declaring our property wrapper. This is making use of the synthesized initializer on our struct. You could make your own init function and use it when declaring the property wrapper.

    Summary

    Property wrappers are super helpful. They can help you take repeated code and patterns away from your properties and move them into a reusable component. As we’ve seen here, you can make various Codable edge cases easy to solve. They can also help you with code you find yourself repeating in things like a set, didSet, or other such case.

    Like other Swift features, property wrappers are just another tool that are worth having in your developer tool box. I hope this post helped demystify them a little bit and make them more approachable for you.

    You can find the code for this post in this Github Gist.